3D Printing Arizona process starts with a digital 3D design file. This file is sliced and then sent to the printer.
The 3D print combines layers of powder with heat to create the final object. The materials used can be plastic, metal, or a mix of both. The print can take hours to complete.
3D printing is the process of converting a virtual, three-dimensional model into a physical object using different types of plastics or resins. Unlike traditional manufacturing methods that cut or drill into material to create the desired shape, 3D printing builds objects layer by layer.
There are many different technologies used in 3D printing, including fused deposition modeling (FDM), stereolithography (SLA) and selective laser sintering (SLS). Each of these processes uses a different method for building the object. FDM uses a nozzle to extrude molten plastic onto a build platform while SLA and SLS use a UV laser to cure liquid resins into solid objects.
Once the object has been built, it is post-processed to remove any supports that may have been left behind and to smooth out any rough areas. It is then ready for usage. Depending on the material used, some finishes are available to enhance the appearance of the final product.
The most common usage of 3D printing is for prototyping purposes. The process enables designers to quickly produce functional prototypes that allow for testing of designs in a realistic setting. It can also be used to make end-use parts for things like cogs, gears and knobs that are difficult or impossible to manufacture with conventional machining tools.
A key advantage of the technology is that it can be used with a wide range of materials, including plastics such as PLA (Poly Lactic Acid), a biodegradable material made from cornstarch, and ABS (Acrylonitrile Butadiene Styrene), a hard material commonly found in Lego bricks. It can also be used with metals such as stainless steel, aluminium and titanium.
Students and faculty can design their own 3D models with software such as TinkerCad, available on the PCs in the DML, or they can download a variety of pre-existing 3D digital models from repositories such as Thingiverse. With a scaffolding instructional approach, it is possible for even the most novice of learners to eventually produce their own physical models.
The DML provides 3D printing services to all students, faculty and staff. Using a simple submission process, users can send a print-ready file to the DML and we will print it for them.
How 3D Printing Works
3D printing is a process of creating three-dimensional objects by building up layers of material, one on top of the other. The layers are solidified or “bound” together using binding agents such as liquids or powders.
To build an object, the person operating the printer first needs a digital 3D model of what they want to make. They can create the model themselves or find one on a website that allows people to share their designs. Then they use software to “slice” the model into thin horizontal layers, each a little smaller than the previous one. The computer will then calculate instructions for the printer on how to put down each layer of the object.
For most 3D printers, these instructions (called G-code) tell the printer to move to a specific location on the machine’s X and Y axis and then put down a little bit of material at that spot. The printer then moves to the next location and repeats the process.
There are different kinds of 3D printers, so the process for each will be slightly different. Some work by pushing hot, melted string of plastic through a small hole, called the extruder head, while others print in powder or resin, or by firing lasers at a big box full of photopolymers such as those used in traditional photographs.
Once an object is printed, it usually needs to cool and harden. It may also need some last touches, such as removing any superfluous support structures or smoothing down rough edges with sandpaper. Some prints may even need to be washed in a liquid or exposed to UV light to help the material bond better.
3D printing can be used to make all sorts of things, from functional prototypes and tools to end-user parts for cars, houses and medical devices. It’s a technology that’s revolutionizing not just manufacturing, but also fields as diverse as fashion, art and education. NSF began supporting the precursors of this technology nearly 40 years ago, and today we see 3D printing in everything from toys to architectural models to medical implants.
Materials
3D printing is a process of building physical objects from a virtual model, such as a CAD drawing or an image saved in a file format. Unlike conventional manufacturing processes such as machining, casting and forging that involve removing material to shape an object, 3D printing builds up an object layer by layer using different types of plastics or resins. There are several different kinds of 3D printers, but the one you’ll find at YorCreate in the Library uses Fused Filament Fabrication (FFF) technology. It is similar to the kind you might have in your home.
The type of material used in a 3D printed object has a significant impact on the finished product’s strength, durability and heat resistance. There are a wide range of materials available, each with its own unique qualities and uses.
Commonly used plastics for 3D printing include PLA (Polylactic Acid) and ABS (Acrylonitrile Butadiene Styrene). Both are made from renewable resources and are eco-friendly. They are suitable for printing decorative items and prototypes that don’t require high heat resistance.
Nylon, on the other hand, offers a great combination of strength, durability and flexibility. It is also able to withstand heat exposure, making it a good choice for end-use components or products that will be exposed to harsh environments.
Composite materials are another option for 3D printing, offering an optimal strength-to-weight ratio. These materials can be combined with other types of material to create functional products, such as flexible joints or electrical insulation.
There are also a number of specialty 3D printer materials, such as biodegradable plastics for food containers or materials that can be used to print electronic circuit boards and magnetic parts. These materials are also useful for medical applications, such as dental models and prosthetics.
YorCreate in the Library is not intended to be a commercial printer. It is a hands-on learning experience that introduces new technology and encourages creativity. Patrons are expected to remain present for the duration of the printing process. Patrons must bring their own flash drive or SD card containing the.stl files for the projects they want to print. YorCreate staff will inspect the files and slice them prior to printing. All materials used for 3D printing must comply with the Library’s Technology Use Policy.
Designing for 3D Printing
When designing for 3D printing you start with a computer-aided design (CAD) model. From here a program known as a’slicer’ turns the model into instructions that can be read by the printer. The slicing software can automatically set up your model for you, or if you want granular control you can manually adjust the settings. The slicing process takes a few minutes or seconds depending on the size of your model and will generate an STL file that you can send to your 3D Printer.
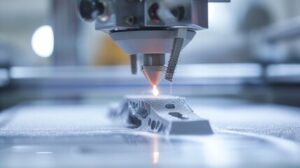
The nozzle of the printer dispenses material onto a platform, building up layers and following your 3D model. The print will take a few hours to days to complete, occasionally needing to be monitored to identify any issues. Once your print is complete the printed part can be removed from the platform and any excess materials can be removed or melted off using post-processing techniques.
3D printing technology has made it possible to create models, tools and functional parts for traditional manufacturing industries like aerospace and automotive but also non-traditional applications including art, architecture, education and entertainment as well as health care. It has accelerated product development cycles and reduced production costs, while also improving part strength and reliability.
In addition to standard plastics and resins, 3D Printers can use a wide variety of metals as well as paper, ceramics, bio tissues and even edible materials. These capabilities allow designers to expand their toolkits, creating new textiles and enhancing the design of musical instruments, tabletop board games and more. They can also be used to make courtroom evidence tactile and help lawyers explain complex concepts visually.
With the proliferation of affordable, user friendly 3D Printers, the opportunities for design and innovation are limitless. From prototyping new medical implants, to constructing a scale model of an aircraft fuselage, 3D printing is transforming the way we work and live. The NIH’s 3D Print Exchange and Thingiverse websites offer free and easy-to-use tools for beginners to get started in this exciting field. Using CAD software like TinkerCAD and GrabCAD Print, you can bring your virtual designs to life.